Inhaltsverzeichnis
Meetings
Meeting in Moodle
Prerequisite: You have logged in to https://jade-hs.zoom.us for the first time (with HS credentials, “SSO”).
1. Switch on editing (in the course room > cogwheel > “Switch on editing”).
2. “Create material or activity”, the selection opens.
Select “Zoom Meeting” (at the bottom of the list) and “Add”.
3. Make settings:
- Topic (mandatory field), appears on the course main page.
- Duration: “recurring”, if the meeting room is used several times.
4. Finish with “Save”.
Recurring meetings in Moodle
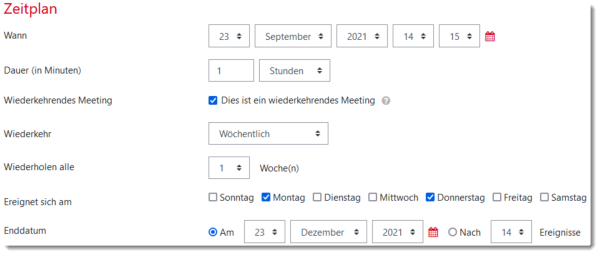
For weekly recurring meetings in Zoom, select the option “This is a recurring meeting”.
Then the frequency of the “return” can be set, e.g. weekly.
The series appointments then appear under “Current appointments” and in the “Calendar” on the student dashboard. These meetings can only be opened on the date set.
A recurring meeting with the option “No specific time” can be started at any time. However, it does not appear on the dashboard.
Zoom meeting via web portal or Outlook
Licensed use of Zoom is possible by logging in via “SSO” with the HS credentials. Help page on plugins for Zoom
Register a co-host for a meeting
Co-hosts can manage participants in a meeting (including letting them in from or moving them to the waiting room) and start or stop the recording. Co-hosts cannot start or stop the meeting.
Only hosts can assign the role of co-host. The function must be active (default setting), see Zoom Web Portal, “Settings”, tab “Meeting” and “In Meeting (Basics)”.
You have two options for appointing a user as a co-host:
- During a meeting:
1. Hover over a user's video.
2. Click the Ellipsis icon.
3. Click Appoint as co-host.
- Using the Participants window.
1. In the meeting controls, click Participants at the bottom of your zoom window.
2. Hover over the name of the participant you want to co-host and select more.
3. Click appoint as co-host.
Co-hosts cannot start meetings. If a host needs someone else to start a meeting, the host can assign an alternate host. If someone else is to create meetings for the host, scheduling permission can be set up.
Register an alternative host for a meeting
You can authorise users in your account to be an “alternate host” for your meeting.
Alternate hosts have access to the same controls as the co-hosts and can also start the meeting.
You and the alternative host must have a licence (e.g. as a student or employee) and you must enter the HS email address used for Zoom.
An alternative host must have logged into the Zoom portal once beforehand via the SSO login.
1. Log in to the Zoom Portal via “Log in”.
In the “Meetings” area and there tab “Pending” now point to the meeting to which an alternative host is to be added.
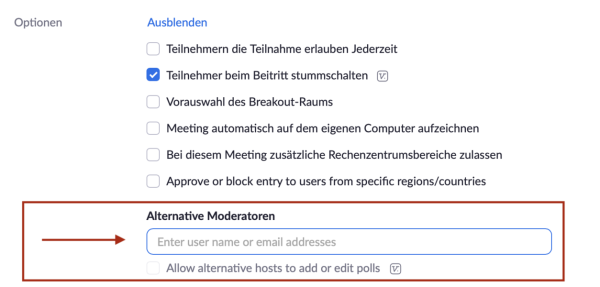
2. Click on “Edit” and then at the bottom on “Options”. If these are hidden, please show them.
3. In the text field under “Alternate moderators” you can now enter the university e-mail address of the desired person and only need to save the change.
Can someone else create a meeting for me?
You can authorise users in your account to schedule meetings on your behalf.
You can also schedule meetings on behalf of someone else who has assigned you scheduling permission.
You and the assigned planner must have a licence (e.g. as a teacher via moodle) and you must enter the HS email address used for Zoom. 1.
1. Log in to the Zoom portal.
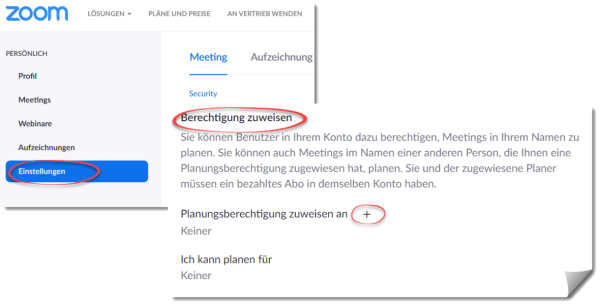
2. In the “Settings” area, under “Allocate permissions” (at the bottom of the page), enter the person who is to plan meetings for you. Please use the plus symbol for this.
The registered person now has the necessary permissions.
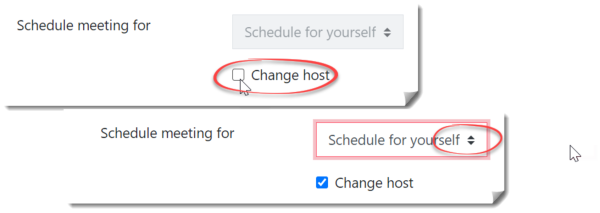
Whenever she creates a new meeting, the item “Schedule meeting for” can now be found in the general settings.
You can view the appointment in your own zoom portal. It appears in the list of your meetings as if you had created it yourself. The other person can no longer edit the meeting as a host.


