Inhaltsverzeichnis
How videos can be added to Moodle?
YouTube videos hint:
Please note that for privacy reasons YouTube videos can only be added via a link in Moodle. A direct upload in the course interface is not possible!
Adding Videos:
Videos up to 256 MB can be uploaded directly to Moodle. For larger files, “video hosting” is a better way.
You can also link to the web address of externally hosted videos, e.g. via the “Link/URL”. Do you already know the TIB AV-Portal for scientific films or the portal for open educational materials “twillo” (funded by MWK)?
Upload videos up to 256 MB directly to Moodle:
1. In edit mode: Click on “Add an activity or resource” and select “Text and media area”.
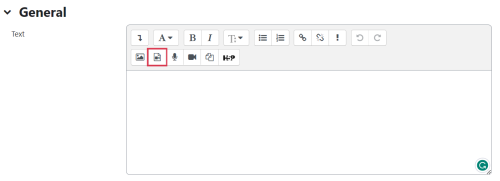
2. Hover and click on the Insert or edit audio/video file icon.
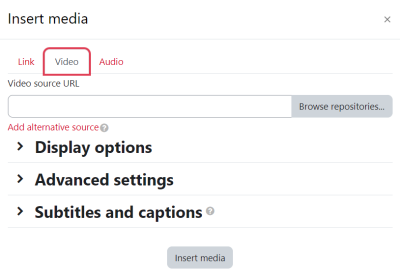
3. Switch to the Video tab, browse and select the locally saved video file with “Choose file”.
4. Finish with “Insert media” and “Save and return to course”.
If the size of the upload is limited, check the settings in the Moodle course: “Files and uploads -maximum file size”.
Videos >256 MB:
You can add videos with a size of 256MB or more via video hosting to Moodle.
Linking external videos in Moodle:
Videos from external video platforms can be added to Moodle via the web addresses (URL).
1. In edit mode: Click on “Add an activity or resource” and select “Text and media area”.
2. Hover and click on the Insert or edit audio/video file icon.
3. Switch to the Video tab and paste the copied URL.
4. Finish with “Insert media” and “Save and return to course”.
Add YouTube videos in Moodle:
This feature is currently not available.
Add YouTube videos in YouTube advance copyright mode.
1. Open a Text area.
2. Activate HTML-Mode with the “</>” icon.
3. On YouTube, copy the Insert code for copyright mode: “Share”, then “Insert”. Active the “Enable advanced copyright” option.
4. Paste in the Text area and “Save changes”.

