Table of Contents
Groups
Create and use groups
Teachers can assign students to Moodle working groups for individual activities.
Example: Each Moodle working group discusses in its own forum. Teachers still see a “Forum” activity, but select the group in each case.
Create groups and enter students manually
You can access the “Groups” via the course menu under “Participants”: Go to “Participants” > Open drop-down menu > Select “Groups”.
- To create new groups continue with:
- “Create group” button
- Assign a group name (optional: enter a group description, assign an enrolment key and upload a group picture for the group's participant list and forum posts)
- Save changes
- Add users to the group
- Select/click on the group
- Manage Users > Select users from possible members > Add
Limit group size
Note:
First create groups in the course room. Then add the activity “Group choice” to the course room.
Under “Groups” select all groups from which students should choose.
Make the following entries in the settings for group selection:
- Activate the option “Allow upper limits for choice”.
- Enter the maximum number of participants under “General upper limit”.
- Confirm with the button “Apply upper limit for all groups”.
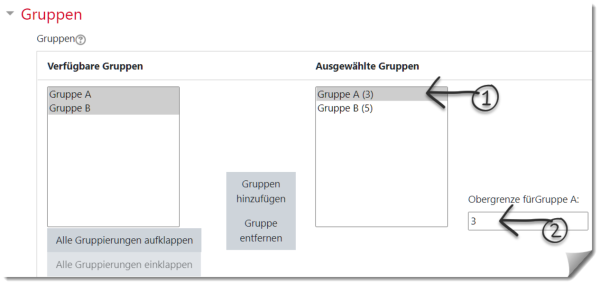
To set different upper limits for individual groups:
1. in the group selection under “Groups”, column “Selected groups”, mark the respective group.
2. Enter upper limit. The change becomes visible as soon as another group is selected.
Group choice: Students self-select a group
The group choice activity allows students to choose their own group.
Note: First create the groups. Then add the group selection.
1. Click on “Create material or activity”.
2. Click on “Group selection” and confirm with the “Add” button.
3. Fill in the form \
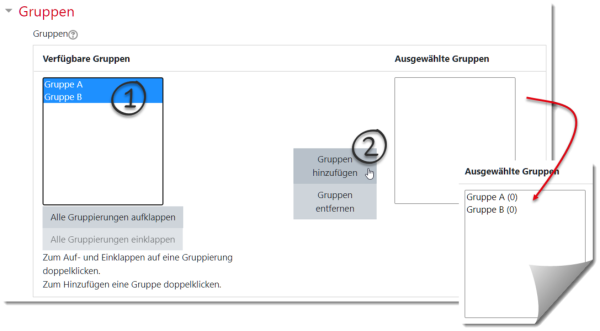
In the Groups section, select all groups that should be available for students to choose from (multiple selection by holding down the CTRL key).
4. Confirm with “Add group” and Save.
Note:
Group voting is on a first-come, first-served basis.
If students should be able to vote in peace or state certain preferences, then the procedure “Fair distribution” is suitable.
Enrolment key: Students choose a group when enrolling
It is possible to enter users directly into groups during self-enrolment.
1. Set a enrolment key for the course.
2. Set the option enrolment key for groups to “Yes”.
3. Save the changes.
Set an enrolment key for the group(s). These keys are also enrolment keys for the course. The course enrolment key is only used to prevent unauthorised access to the course, but it is not needed by the course participants - they only use the enrolment key for their respective group.
See also: https://docs.moodle.org/en/Enrolment_key#Setting_a_group_enrolment_key (moodle.org)
Registered by list with assignment of the group
If students are enrolled in the course room using the “Enrolment by list” method, a group affiliation can be defined at the same time.
The list of e-mail addresses then has the following form:
# Group A
lisa.mueller@student.jade-hs.de
max.onnen@student.jade-hs.de
# Group B
murat.meier@student.jade-hs.de
Group access for activities or material
Scenario: Only students in certain groups should have access to an activity (or work material).
Prerequisite: Moodle groups have been created in the course room.
1. Open the settings of the activity or work material.
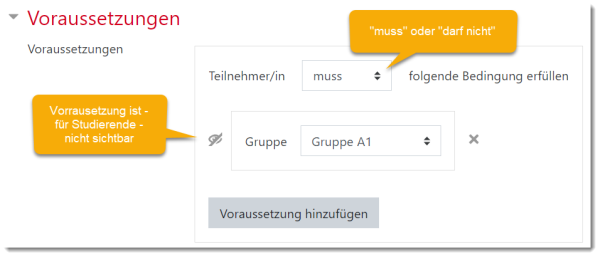
2. Click the button “Add prerequisite” in the “Prerequisite” section.
3. Click the “Group” button.
- Select: Condition “must” be fulfilled.
4. Select the Moodle group that is allowed to access.
5. Click the eye to switch the visibility of the prerequisite for students to either visible or invisible
Add more Moodle groups that are allowed to access if needed.
6. Finish with “Save …”.
Use activities divided into groups
Set group mode:
Activities in the course that are operated in group mode allow user contributions to be filtered according to group affiliation.
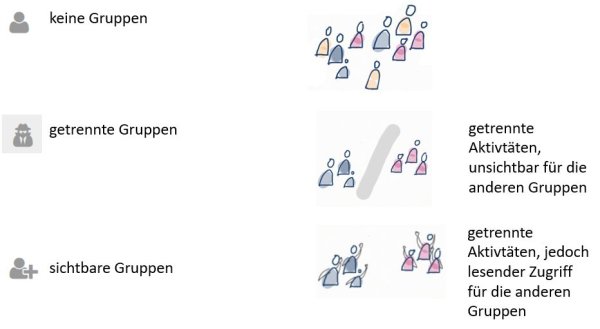
For each activity you can decide whether the groups should work together, separately (but visible to each other) or completely invisible to each other.
We recommend setting this per activity (instead of course-wide).
Prerequisite: The Moodle workgroups have been created.
Set the group mode of the respective activity:
1. Open the settings for the activity.
2. In the area “Further settings” you can select the group mode.
Group mode: three variants
More ...
- Documentation on moodle.org - https://docs.moodle.org/en/groups


