Table of Contents
Enrol manually
Enrol participants manually

Figure: “Participants” tab in the course menu.
- Select the “Participants” tab in the course menu at the top. You will see the list of students for this course room.
- Click on the “Enrol users” button. A dialog box will open.
- Use the search field to search for the first name, surname or e-mail address and select the entry. If necessary, change the role from “Student” (default) to e.g. “Teacher” (write permission) or “Studentische Hilfskraft” (edit but not evaluate).
- Confirm with “Enrol selected users and cohorts” to exit the window.
The new participants are then displayed in the list.
There is no automatic information to students or participants about their manual enrolment.
If required: Add or remove a role by clicking on the pencil icon in the “Role” column. Select or delete role(s) and save.
Remove students from course (or change role and group)
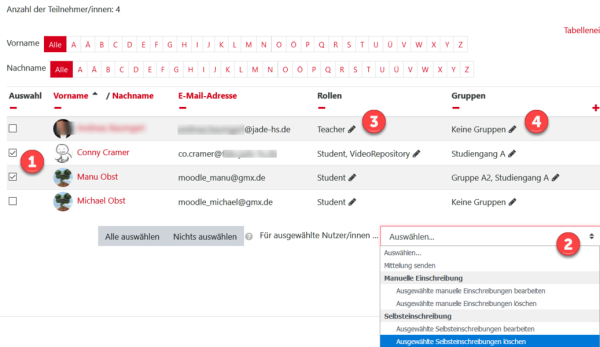
Several participants can be edited simultaneously in the participant list. You can remove several participants from the course in one step, for example. For the semester change, we recommend resetting the course so that work results and student contributions are permanently removed.
The editing rights (roles) and group membership of participants can also be changed in the participant list.
1. Select “Participants” in the course navigation to display the list of participants.
Select all participants concerned in the selection column.
2. Choose the desired processing, e.g. remove participants from the course room: “Delete selected user enrolments”.
If required: Add or remove a role by clicking on the pencil icon in the “Roles” column. Select or delete role(s) and save.
If required: Edit group membership by clicking on the pencil symbol in the “Groups” column. Select or delete group(s) and save.
Enrol participants via list
You can get a list of the students to be enrolled, e.g. for an e-examination, from the eCampus.
1. Click on “Participants” in the course navigation.
2. Select “Enrolment methods” from the drop-down menu and then click on “Enrol users” icon in the “Edit” column of “Manual enrolments”.
3. Insert the e-mail addresses or the names of the students, e.g. via the clipboard in the search bar.
4. Select the participant, assign the role and then click on the “Add” button .
Enter the "Teacher" role
The “Teacher” role can see student numbers. To avoid assigning it to students, only administrators and managers can assign this role.
If the “Teacher” role needs to be assigned, please contact Moodle Support with the course URL.
The “Student Tutor” role is identical to the “Teacher” role except for the display of the student number.
See also keyword “matriculation number”.
- More about Participants on Moodle.org
- See also Enrolment FAQ on Moodle.org


