This is an old revision of the document!
Table of Contents
Groups
Create and use groups
Teachers can assign students to Moodle working groups for individual activities.
Example: Each Moodle working group discusses in its own forum. Teachers still see a “Forum” activity, but select the group in each case.
Create groups and enter students manually
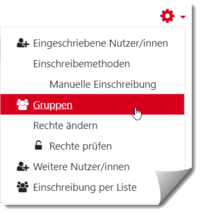
1. create groups: Participants > “gear icon” > “Groups” entry.
- To create new groups continue with:
- “Create group” button
- Assign a group name (optional: enter a group description, assign an enrolment key and upload a group picture for the group's participant list and forum posts)
- Save changes
- Add users to the group
- Select/click on the group
- Manage Users > Select users from possible members > Add
Limit group size
Note:
First create groups in the course room. Then add the activity “Group selection” to the course room.
Under “Groups” select all groups from which students should choose.
Make the following entries in the settings for group selection:
- Activate the option “Allow upper limits for choice”.
- Enter the maximum number of participants under “General upper limit”.
- Confirm with the button “Apply upper limit for all groups”.
To set different upper limits for individual groups:
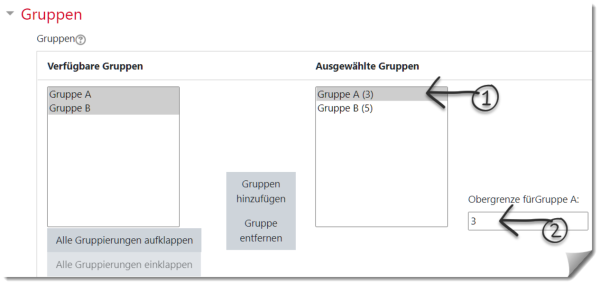
1. in the group selection under “Groups”, column “Selected groups”, mark the respective group.
2. Enter upper limit. The change becomes visible as soon as another group is selected.
Group choice: Students self-select a group
The group choice activity allows students to choose their own group.
Note: First create the groups. Then add the group selection.
1. Click on “Create material or activity”.
Click on “Group selection” and confirm with the “Add” button.
3. Fill in the form \
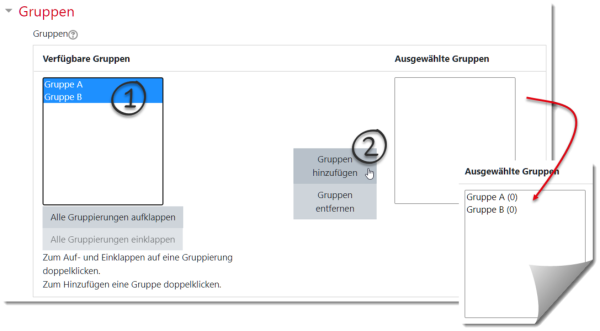
In the Groups section, select all groups that should be available for students to choose from (multiple selection by holding down the CTRL key).
4. confirm with “Add group” and Save.
Note:
Group voting is on a first-come, first-served basis.
If students should be able to vote in peace or state certain preferences, then the procedure “Fair distribution” is suitable.
Enrolment key: Students choose a group when enrolling
It is possible to enter users directly into groups during self-enrolment.
1. set a enrolment key for the course.
2. set the option enrolment key for groups to “Yes”.
3. save the changes.
Set an enrolment key for the group(s). These keys are also enrolment keys for the course. The course enrolment key is only used to prevent unauthorised access to the course, but it is not needed by the course participants - they only use the enrolment key for their respective group.
See also: Einschreibeschlüssel für eine Gruppe setzen (moodle.org)
Einschreiben per Liste mit Zuweisen der Gruppe
Werden Studierende mit der Methode “Einschreibung per Liste” in den Kursraum eingetragen, so kann gleichzeitig eine Gruppenzugehörigkeit festgelegt werden.
Die Liste der E-Mail-Adressen hat dann folgende Form:
# Gruppe A
lisa.mueller@student.jade-hs.de
max.onnen@student.jade-hs.de
# Gruppe B
murat.meier@student.jade-hs.de
Gruppenzugriff für Aktivitäten oder Material
Szenario: Nur Studierende in bestimmten Gruppen sollen Zugriff auf eine Aktivität (oder ein Arbeitsmaterial) erhalten.
Voraussetzung: Im Kursraum sind Moodle-Gruppen angelegt.
1. Öffnen Sie die Einstellungen der Aktivität oder des Arbeitsmaterials.
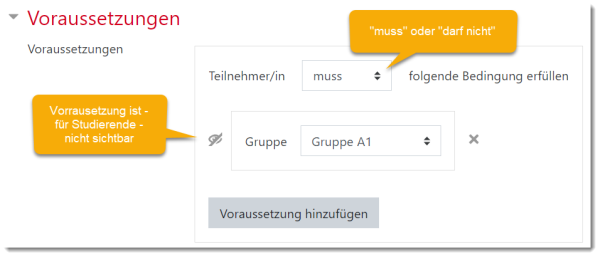
2. Im Bereich “Voraussetzung” die Schaltfläche “Voraussetzung hinzufügen” anklicken.
3. Schaltfläche “Gruppe” anklicken.
- Auswählen: Bedingung “muss” erfüllt sein.
4. Die Moodle-Gruppe auswählen, die zugreifen darf.
5. Das Auge anklicken, um Sichtbarkeit der Voraussetzung für Studierende entweder sichtbar oder unsichtbar zu schalten
Bei Bedarf weitere Moodle-Gruppen hinzufügen, die zugreifen dürfen.
6. Abschließen mit “Speichern …”.
Aktivitäten in Gruppen aufgeteilt nutzen
Gruppenmodus einstellen:
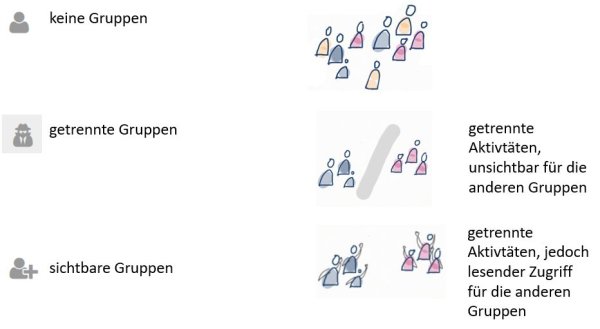
Aktivitäten im Kurs, die im Gruppenmodus betrieben werden, erlauben es, Nutzerbeiträge nach Gruppenzugehörigkeit zu filtern.
Für jede Aktivität können Sie entscheiden, ob die Gruppen gemeinsam, getrennt (aber füreinander sichtbar) oder völlig unsichtbar füreinander arbeiten sollen.
Wir empfehlen, diese Einstellung je Aktivität vorzunehmen (statt kursweit).
Voraussetzung: Die Moodle-Arbeitsgruppen sind angelegt.
Legen Sie den Gruppenmodus der jeweiligen Aktivität fest:
1. Öffnen Sie die Einstellungen der Aktivität.
2. Im Bereich “Weitere Einstellungen” können Sie den Gruppenmodus auswählen.

